Rich drag-and-drop in React.js
In this example, I will show how drag-and-drop can be implemented simply and flexibly in a React.js application. You can check out the finished example in this code pen or on GitHub.
Our system introduces React components called Draggable and DropTarget, and allows us to apply constraints on which Draggable/DropTarget combinations are allowed. This sort of rules-based feedback is common in many drag-and-drop applications, and absolutely essential to the system we’re building at m›PATH.
The example is based on normal mouse events and sidesteps the HTML5 drag-and-drop API. The standard API works pretty well in modern browsers these days, and can often be the simplest way to get something working. However, implementation can be somewhat confusing, and the API gives us limited control over the drag image (the transparent copy of what's being dragged.) If you're interested in combining React and HTML5 drag-and-drop, check out this article by Daniel Stocks.
In the following, I will go through some of the interesting details about the approach.
Problem overview

For this example, our rules will be simple: We have green and blue SourceObjects, and we have DropTargets that accept blues, greens, both, or none.
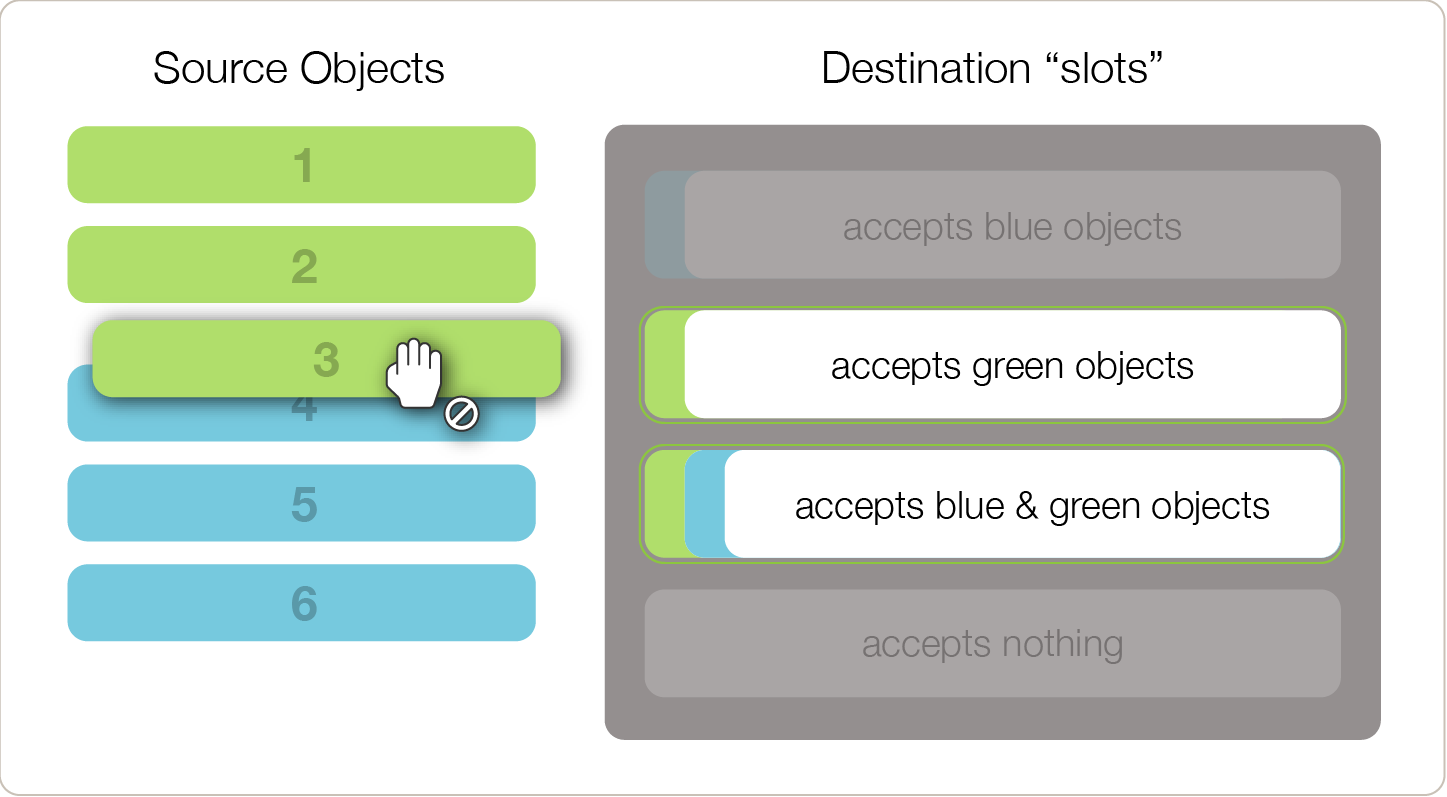
As a drag starts, the dragged item is removed from the list and the cursor changes. The valid DropTargets are given a highlight treatment and the invalid ones get toned down. This helps the user by visualizing the otherwise unseen rules about which drags are allowed.
(Well, in this case I guess the rules are visible already—in many real-world cases they will not be as clear-cut as this, and we might not be able to color code them all.)
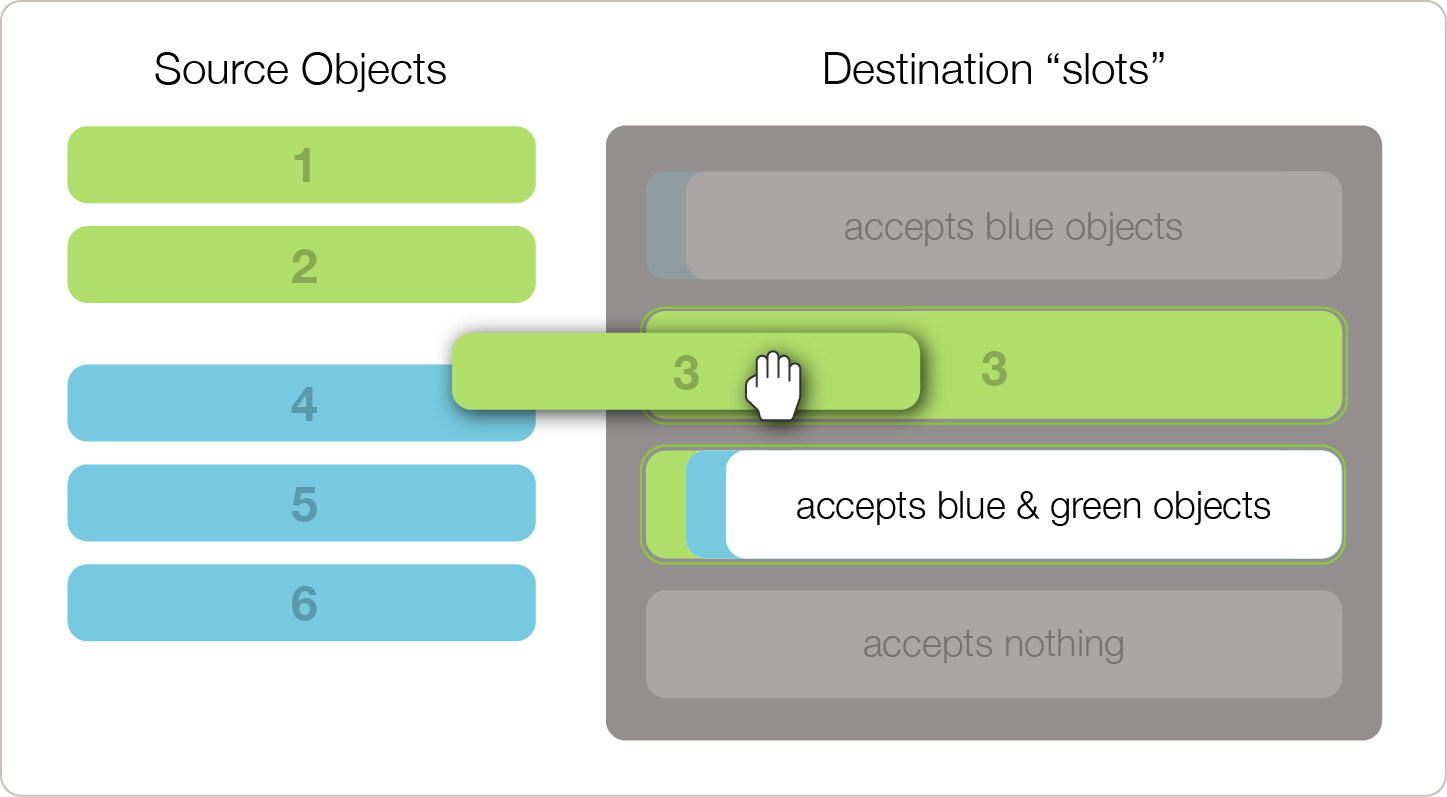
Once the drag is over a valid DropTarget, we update the target again to show what a drop here would result in. This helps the user determine if the effect is as intended, saving her from having to undo something unintended.
High-level overview of solution
To allow these interactions, we will define the following responsibilities.
- Our root component
Examplewill hold the state of thecurrentDragItem. - Green and blue
SourceObjectswill render using a customDraggablecomponent that will handle the drag-and-drop logistics. - The
DropTargetcomponents will be given a reference to thecurrentDragItem, and use it to update their appearance according to the current drag state. - The
Draggablewill let the application know when a drag starts and stops, while theDropTargetwill let the application know about a completed (valid) drop.
Main application component
For the implementation, we'll use CoffeeScript and Lodash to cut down on the boilerplate. The main component looks like this:
{div, p} = React.DOM

document.addEventListener 'DOMContentLoaded', ->
  React.renderComponent Example(), document.body

Example = React.createClass
  getInitialState: ->
    currentDragItem: null

  render: ->
    div
      className: ""dnd-example #{'dragging' if @state.currentDragItem}""
      children: [
        SourceObjects
          onDragStart: @onDragStart
          onDragStop: @onDragStop
        DropTargets
          currentDragItem: @state.currentDragItem
          onDrop: @onDrop
        @dropDescription()
      ]

  onDragStart: (details) ->
    @setState currentDragItem: details

  onDragStop: ->
    @setState currentDragItem: null

  onDrop: (target) ->
    @setState lastDrop:
      source: @state.currentDragItem
      target: target

  dropDescription: ->
    if drop = @state.lastDrop
      p
        className: 'drop-description'
        children: ""Dropped source #{drop.source.type}-#{drop.source.index}
                          on target #{drop.target.index}""
The interesting part here is that our root component, Example, is keeping track of the currentDragItem. This allows the information about what is currently being dragged to get propagated to any component that is interested.
The benefit of spreading such information is that we can use it to provide feedback to the user. For example, we might want to show a tooltip mid-drag that describes the result of the current drag in words, such as “Connect source object #2 with target #5.” This could help users learn and understand our app’s conceptual model.
The other part worth noting is that callbacks are passed down into child components so that they can notify the Example about the drag events we're interested in keeping track of.
Draggable “source objects”
SourceObjects = React.createClass
  render: ->
    div
      className: 'dnd-source-objects'
      children: for object, i in @objects()
        SourceObject
          type: object.type
          index: i + 1
          children: i + 1
          onDragStart: @props.onDragStart
          onDragStop: @props.onDragStop

  objects: ->
    _.flatten [
      { type: 'green' } for i in [0..2]
      { type: 'blue' } for i in [0..2]
    ]

SourceObject = React.createClass
  render: ->
    Draggable
      className: ""dnd-source-object #{@props.type}""
      children: @props.children
      onDragStart: @props.onDragStart
      onDragStop: @props.onDragStop
      dragData: @dragData

  dragData: ->
    type: @props.type
    index: @props.index
Next up is our source objects, which represent the draggable objects we see on the left in the mockups.
In the render method of SourceObject, we can see the interface of our Draggable. A component that wants to become draggable should provide a prop callback dragData so that on successful drops, the root component will have the data it needs to determine what will happen next.
The “Draggable” component
LEFT_BUTTON = 0
DRAG_THRESHOLD = 3 # pixels

Draggable = React.createClass
  getInitialState: ->
    mouseDown: false
    dragging: false

  render: ->
    @transferPropsTo div
      style: @style()
      className: ""dnd-draggable #{'dragging' if @state.dragging}""
      children: @props.children
      onMouseDown: @onMouseDown

  style: ->
    if @state.dragging
      position: 'absolute'
      left: @state.left
      top: @state.top
    else
      {}

  onMouseDown: (event) ->
    if event.button == LEFT_BUTTON
      event.stopPropagation()
      @addEvents()
      pageOffset = @getDOMNode().getBoundingClientRect()
      @setState
        mouseDown: true
        originX: event.pageX
        originY: event.pageY
        elementX: pageOffset.left
        elementY: pageOffset.top

  onMouseMove: (event) ->
    deltaX = event.pageX - @state.originX
    deltaY = event.pageY - @state.originY
    distance = Math.abs(deltaX) + Math.abs(deltaY)

    if !@state.dragging and distance > DRAG_THRESHOLD
      @setState dragging: true
      @props.onDragStart? @props.dragData?()

    if @state.dragging
      @setState
        left: @state.elementX + deltaX + document.body.scrollLeft
        top: @state.elementY + deltaY + document.body.scrollTop

  onMouseUp: ->
    @removeEvents()
    if @state.dragging
      @props.onDragStop()
      @setState dragging: false

  addEvents: ->
    document.addEventListener 'mousemove', @onMouseMove
    document.addEventListener 'mouseup', @onMouseUp

  removeEvents: ->
    document.removeEventListener 'mousemove', @onMouseMove
    document.removeEventListener 'mouseup', @onMouseUp
Finally, we get to the core of our system, the Draggable itself. Most of this code is concerned with keeping track of mousedown state and deltas from where the drag began.
It is worth noting here that when a potential drag starts, we add listeners to the document. If the listeners were to reside on the DOM node of this component, we would risk dragging “too fast” and losing our drag item.
It is also worth pointing out that using raw event listeners like this goes somewhat against the grain of React. We lose the benefits of synthetic (browser-normalized) events and automated event delegation, and it also makes the app slightly harder to understand, since the developer now needs to know the difference. If you have a better way of achieving the same effect, please let me know!
The “drop targets”
DropTargets = React.createClass
  render: ->
    div
      className: 'dnd-drop-targets'
      children: for target, i in @targets()
        DropTarget
          target: target
          index: i
          currentDragItem: @props.currentDragItem
          onDrop: @props.onDrop

  targets: ->
    [
      { accepts: ['blue'] }
      { accepts: ['green'] }
      { accepts: ['blue', 'green'] }
      { accepts: [] }
    ]
DropTargets is a simple wrapper that sets up the targets with their constraints. In order for them to be able to make decisions about how to present themselves, they need to know about the currentDragItem.
DropTarget = React.createClass
  getInitialState: ->
    hover: false

  render: ->
    div
      className: @classes()
      children: 'accepts ' + @acceptsDescription()
      onMouseEnter: => @setState hover: true
      onMouseLeave: => @setState hover: false
      onMouseUp: @onDrop

  classes: ->
    [
      'dnd-drop-target'
      ""#{@props.target.accepts.join ' '}""
      'active' if @active()
      'active-green' if @active() and @props.currentDragItem.type == 'green'
      'active-blue' if @active() and @props.currentDragItem.type == 'blue'
      'disabled' if @disabled()
      'hover' if @state.hover
    ].join ' '

  active: ->
    item = @props.currentDragItem
    item and item.type in @props.target.accepts

  disabled: ->
    item = @props.currentDragItem
    item and item.type not in @props.target.accepts

  acceptsDescription: ->
    if @props.target.accepts.length > 0
      @props.target.accepts.join ' & '
    else
      'nothing'

  onDrop: ->
    if @active()
      @props.onDrop? index: @props.index + 1
Finally, most of the code in DropTarget is concerned with providing the user with good feedback about whether this target is valid or invalid, and whether a drop is about to take place if she releases the mouse button now.
Here's what the final result looks like, when treated with a nice little sprinkle of SASS styles. The source is available on GitHub as well.
Next steps
Although the solution outlined above works well, it is quite noisy and verbose. In a perfect world, it would be nice if we could skip some of the implementation details and instead have drag-and-drop be made to feel more native and declarative. For instance, it might look something like:
SourceObject
  draggable: true
  dragData: type: 'green'

DropTarget
  droppable: true
  constrainDrops: (dragData) -> dragData.type in ['green', 'blue']
Moving forward, it would be great to have a powerful, community standard drag-and-drop solution in our React UI toolbox. Please let me know in the comments if you're interested in joining forces to put something like this together!
Take care,
/Kent William
If you want more updates from me, I have an RSS feed and a Twitter profile, and if you'd like to get in touch—m›PATH is hiring—you can reach me at kentwilliam [ at ] gmail [ dot ] com.